
Migrating a Site from One Host to Another
Now and again it becomes necessary to switch your website host. There can be many reasons for the switch. Maybe the current server…
- Is getting too expensive
- Offers poor support
- Runs too slow
- Has limited functionality and you want to expand
Whatever the reason, the process for migration can be quick and painless or complicated depending on the site. Here’s my own process for doing it:
Get new server online
Unless you want your website down for the stretch of time it takes to migrate to the new host, you should get your new server up first. Yes, you will be paying for 2 servers at once, but the alternative is an offline site which could seriously affect your search engine visibility (and you won’t be paying for both for very long).
Which host you decide to move your site to is important. You don’t want to have to switch hosts again after you realize the one you just purchased doesn’t have all the features you want. Here’s an eHow article to help you focus on the features you want. I’d personally recommend using a Unix/Linux server since they typically support more functionality than a Windows server (as you’ll see when we talk about file permissions).
When you put your new host online, make sure you don’t also transfer your domain name. This is the final step. Instead, you should be able to access the files on the new host through an IP address provided to you by the server.
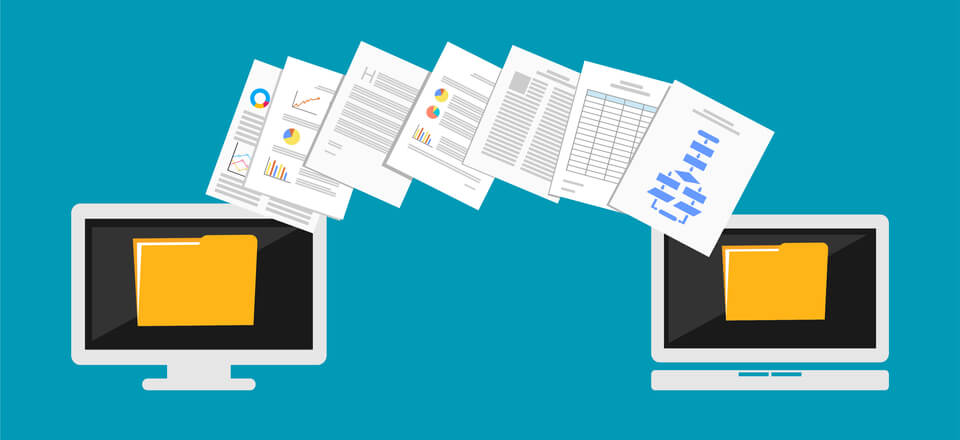
Copy / Paste Files
Your website may consist of images, html pages, javascript files, PHP files, ASP pages, etc. All these files need to be copied down from your old host and re-uploaded to the new one. This is typically done via FTP, using a tool like:

You don’t just want the files copied down, but also the hierarchy of folders. This is essentially the same thing you’d do when making a backup of your site (if it’s not database-driven). Copy everything down from the root folder of your old server and, using FTP again, upload them to root folder of your new server.
Export and Import the Database
If your website consists of flat files, i.e. no database, then you can skip this step. Otherwise, you’ll need to export and import your database(s).
Most servers that provide database support have tools that will automatically “backup” your database. You may need to do some research on where these tools are if it’s not intuitive (and don’t hesitate to annoy your hosting company if you can’t find them… it’s their job to handle requests like these). The backup is simply your database exported as an .sql file that when run on the new server will create the same structure and tables that exists on the original. If you do not have the ability to export your own database, you may need to contact your server and have them do it for you.
Once you have the file, check with your new server how to import it. Most popular servers (like GoDaddy) have import tools to make this easier. Importing might take a while (depending on the size and complexity of your database), but typically not very long. Here’s some detail from GoDaddy on how to use these services:
GoDaddy’s downloading your backup file
GoDaddy’s restore your backup file
When you’ve successfully imported the database to the new server, breathe easy. You’re almost there. Go through your new site and do a check to make sure whatever database-driven functionality was there now works (test things like logging in, posting comments, answer poll questions, etc.). The site may not be perfect yet, but if the functionality is mostly working then you should be alright to move onto the next step.
Note: You won’t be importing the database again, so make sure any changes that occur to your old site after this point are re-entered in the new one. This is not the time to start making updates to the old site.
Edit Configuration Files
Even though you’ve copied over all your files and copied over your database you may not have copied everything you need yet.
Some servers don’t give you access to certain configuration files because they like to have the control on their side (this is especially true for shared-hosting packages). So what happens when you have an older site that uses PHP 4 and you move it to a server where the default configuration is for PHP 5? You’ll need to either update your PHP files so they work with PHP 5 or, more easily, copy PHP 4’s configuration ini and put it in the root directory of your new site. Configuration files cascade downward, so the more specific will overwrite the more general.
This may not be necessary, but if you are having problems with your site at this point, check the config files, including:
- Php.ini (for php sites)
- .htaccess
- File Permissions
There may be other config files that exist depending on the language you’ve used to code your website (ASP, Ruby, Perl, etc.).
In rarer cases, you may need to change your “File Permissions.” This is the access level of each of your files on the server and how they can access each other. When you’ve copied the FTP files, you should have also copied over their permissions. This isn’t always the case though, so to edit a file’s permissions follow these steps:
On a Unix server
You can make the change right through the FTP client.
In FileZilla, Right click on a file and choose “file permissions.” A screen like this should appear:
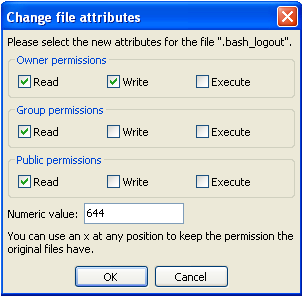
The numeric value is the same as you’d set if you had command-line access to your server and used CHMOD. The FTP fill permissions option does the same thing as CHMOD, so unless you need to do more complex permission handling, this should be enough.
On a Windows server
This article explains the different ways of changing your file permissions on a windows server.
Test
At this point you should have a complete replica of your old site hosted on your new server. A case where it may not look the same is if there are any links or images in your site that are referenced absolutely.For instance, an image that’s path is at www.mysite.com/images/hello.jpg obviously won’t work at 192.0.0.1/images/hello.jpg. You can either change the paths so everything is relative or if you’re confident that this is the only problem, you can do nothing and when you change the domain to point to the new IP address the problem should be resolved.
Update Nameserver
Once you’re satisfied everything is working as it should, it’s time to move the nameserver. If you own the domain name, you would need to edit the properties of the DNS to point to your new hosting account. This is typically done by changing two of the nameservers from the old host to the new (the primary nameserver and the secondary). So log in to whatever server you’ve purchased the domain name through and edit the nameserver from there. The address it’s pointing to should be provided by the new host. Since this is different for each server, you’ll need to do a little research to see how it’s done. This is also something very common with servers so if you have any questions along the way you should have no problem finding support.
When the DNS is resolving to point to your new host, your site may be offline for the duration of that time. However, here’s some info on how to switch between hosts with no downtime.
Delete Old Account
After everything is thoroughly tested and you’re confident you’ve done a successful migration, go ahead and revisit your old host. First, delete all the files from the host (you don’t want these showing up again later if you’re dealing with a disreputable hosting company). Second, cancel the account.
Once your old account is canceled and you’re back to paying only for one host again, give yourself a pat on the back. You’ve successfully migrated your site.

